I Built a Tool That Maps My Home Network and Texts Me When Something Looks Weird
A few months ago, I realized I had no idea what was actually connected to my WiFi. Not in a vague “there are probably some devices” way. I mean I literally could not tell you how many hosts were on my network at any given moment. My router’s admin panel showed a list, but it was stale, incomplete, and about as user-friendly as a 90s printer driver.
In security, people say “you can’t protect what you can’t see,” but the less glamorous truth is that you can’t even begin to think about protection until you have a list. A boring, reliable, preferably automated list. That is what a network security baseline is at its core.
So I built one to serve as my personal network security baseline. I called it netsec-baseline-recon, mostly because I was drinking coffee and feeling dramatic. What it actually does is scan my network, figure out what’s on it, check if anything is running outdated software with known vulnerabilities, and send me a tidy summary on Telegram. It takes about three minutes and it doesn’t require installing anything on the devices themselves.
This post is about how it works, why I made the choices I did, and what I learned about building a practical network security baseline. If you’re into security, you’ll recognize the patterns. If not, hopefully you’ll come away understanding why this stuff matters even on a home network. For a similar take on detection engineering, see my Suricata IDS pipeline. For cloud hardening, read about my self-hosted cloud security lab.
Quick Overview
What It Does
Asset Discovery
arp-scan roll call + Nmap service fingerprinting with stealthy SYN packets.
CVE Enrichment
Queries the NVD API to match software banners against known vulnerabilities.
Telegram Alerts
Tidy summary delivered to your phone with red flags for critical CVEs.
Docker Container
Alpine Linux base, under 90 MB, runs without root privileges on any host.
Full Baseline
Complete scan in under 3 minutes with no endpoint agents required.
The Network Security Baseline Problem: “Wait, What Is That Device?”
Home networks are sneakily complex. You start with a laptop and a phone. Then you get a smart TV. Then a roommate brings a gaming console. Then you buy a cheap security camera from a brand you’ve never heard of. Before you know it, you have twenty things talking to the internet and you only recognize half of them.
In corporate environments, expensive agents and asset databases are supposed to solve this. In reality, they miss ephemeral devices, IoT hardware, and that one Linux box someone spun up for “temporary” testing three years ago. At home, you don’t even have the illusion of control. You just have a router pretending everything is fine.
I wanted an honest snapshot for my network security baseline. No agents on endpoints. No third-party cloud service hoarding my data. Just a periodic scan that builds a network security baseline. Just a periodic scan that tells me: here are the devices, here is what they are running, and here is how the network security baseline is holding up., here’s what they’re running, and here are the known vulnerabilities you should probably know about.
The Pipeline in Plain English: Building a Network Security Baseline
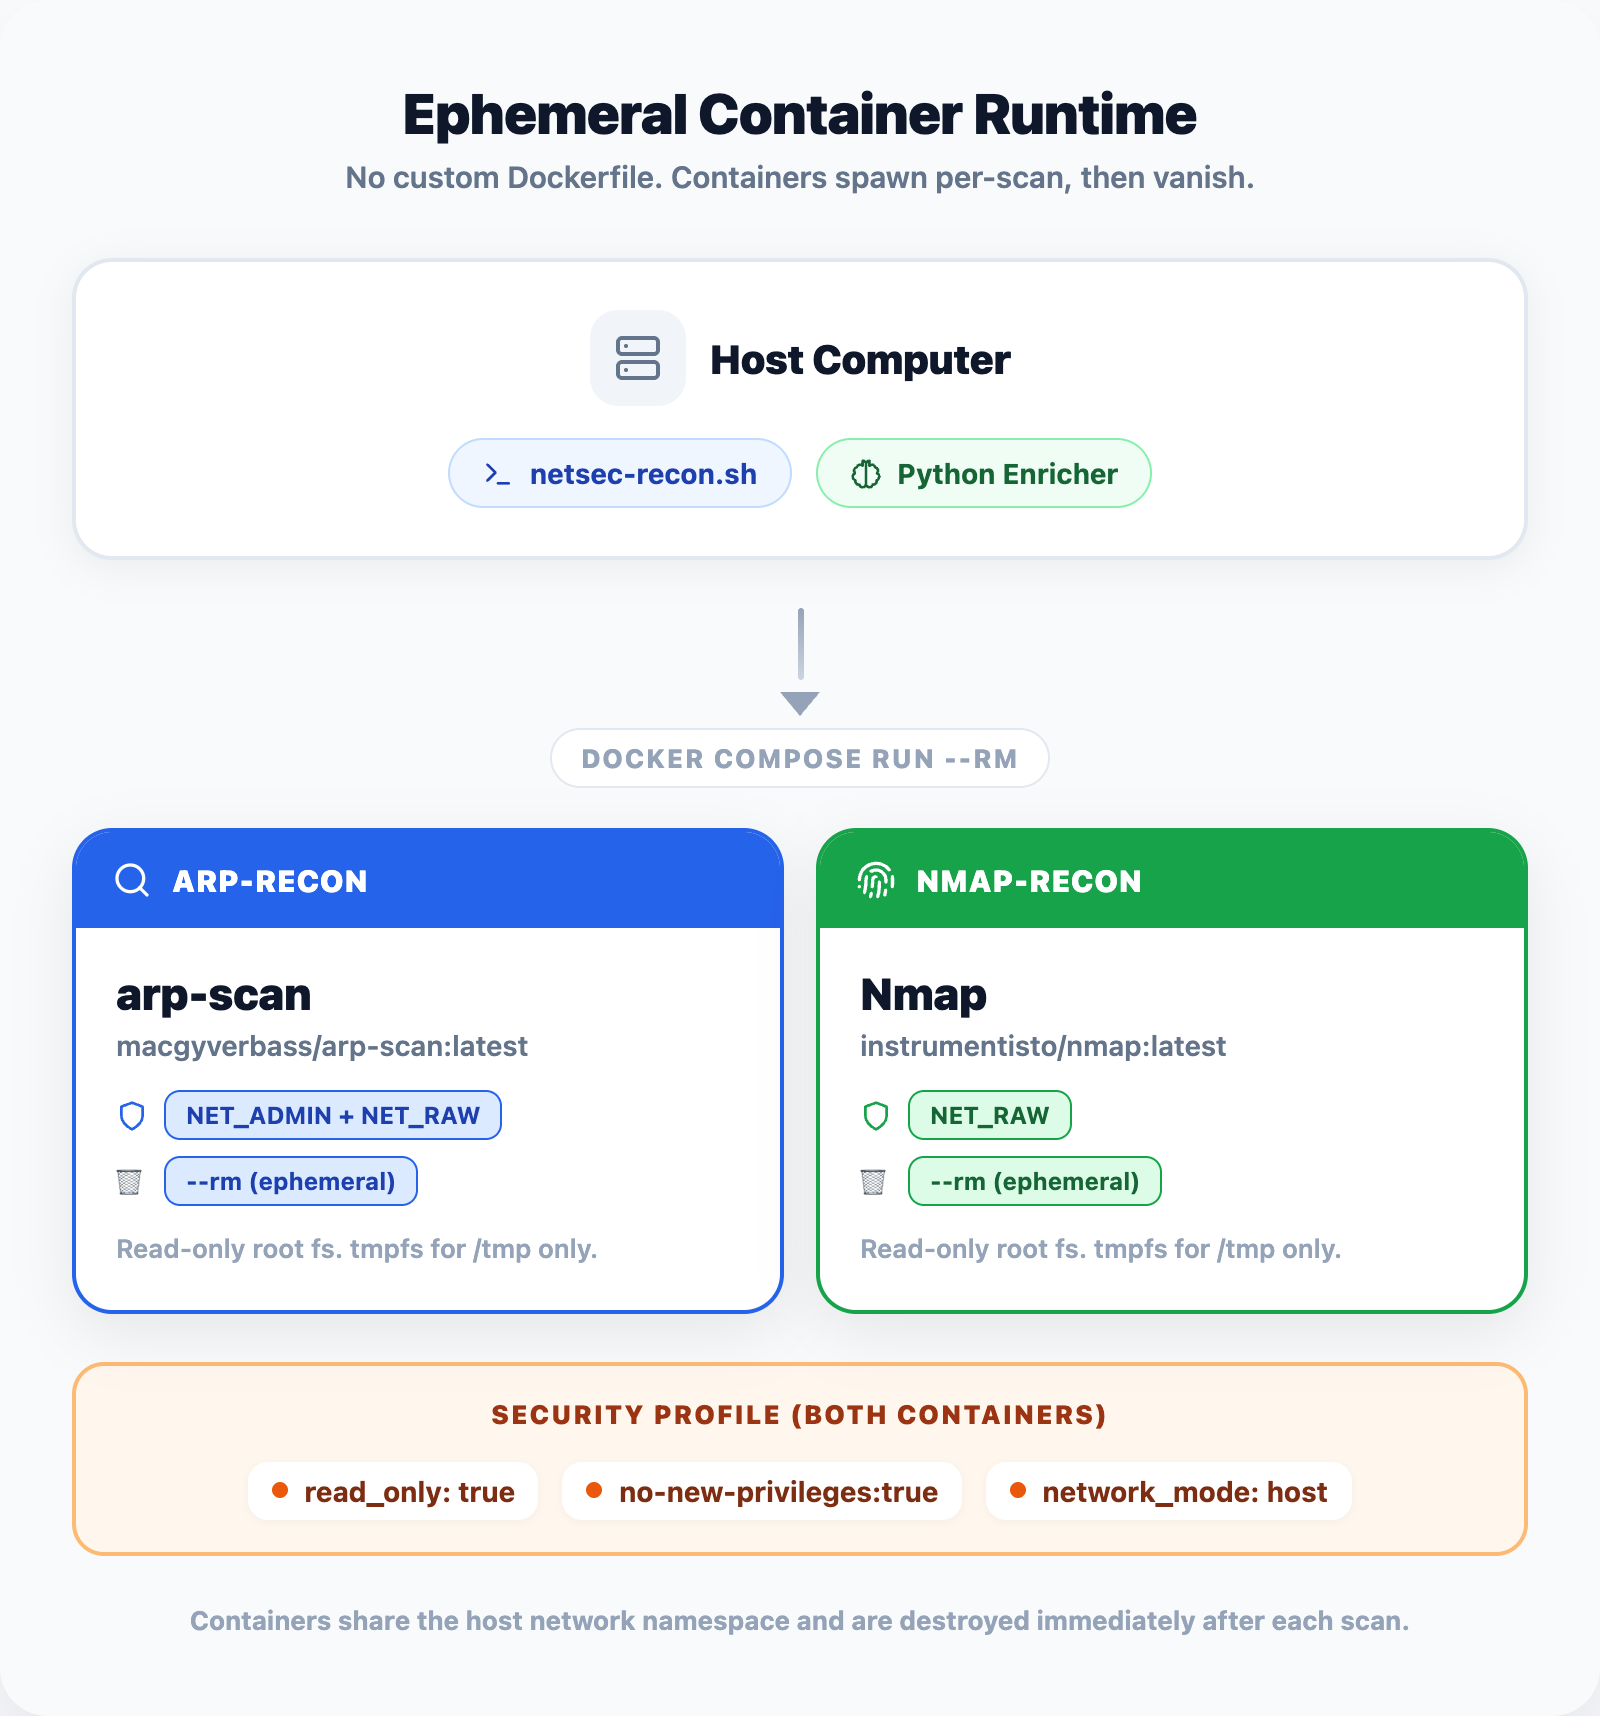
The tool is four small programs that pass data like a relay race, each stage contributing to a complete network security baseline. I wrapped the scanning layer in Docker because I got tired of fighting Nmap dependencies on my laptop.
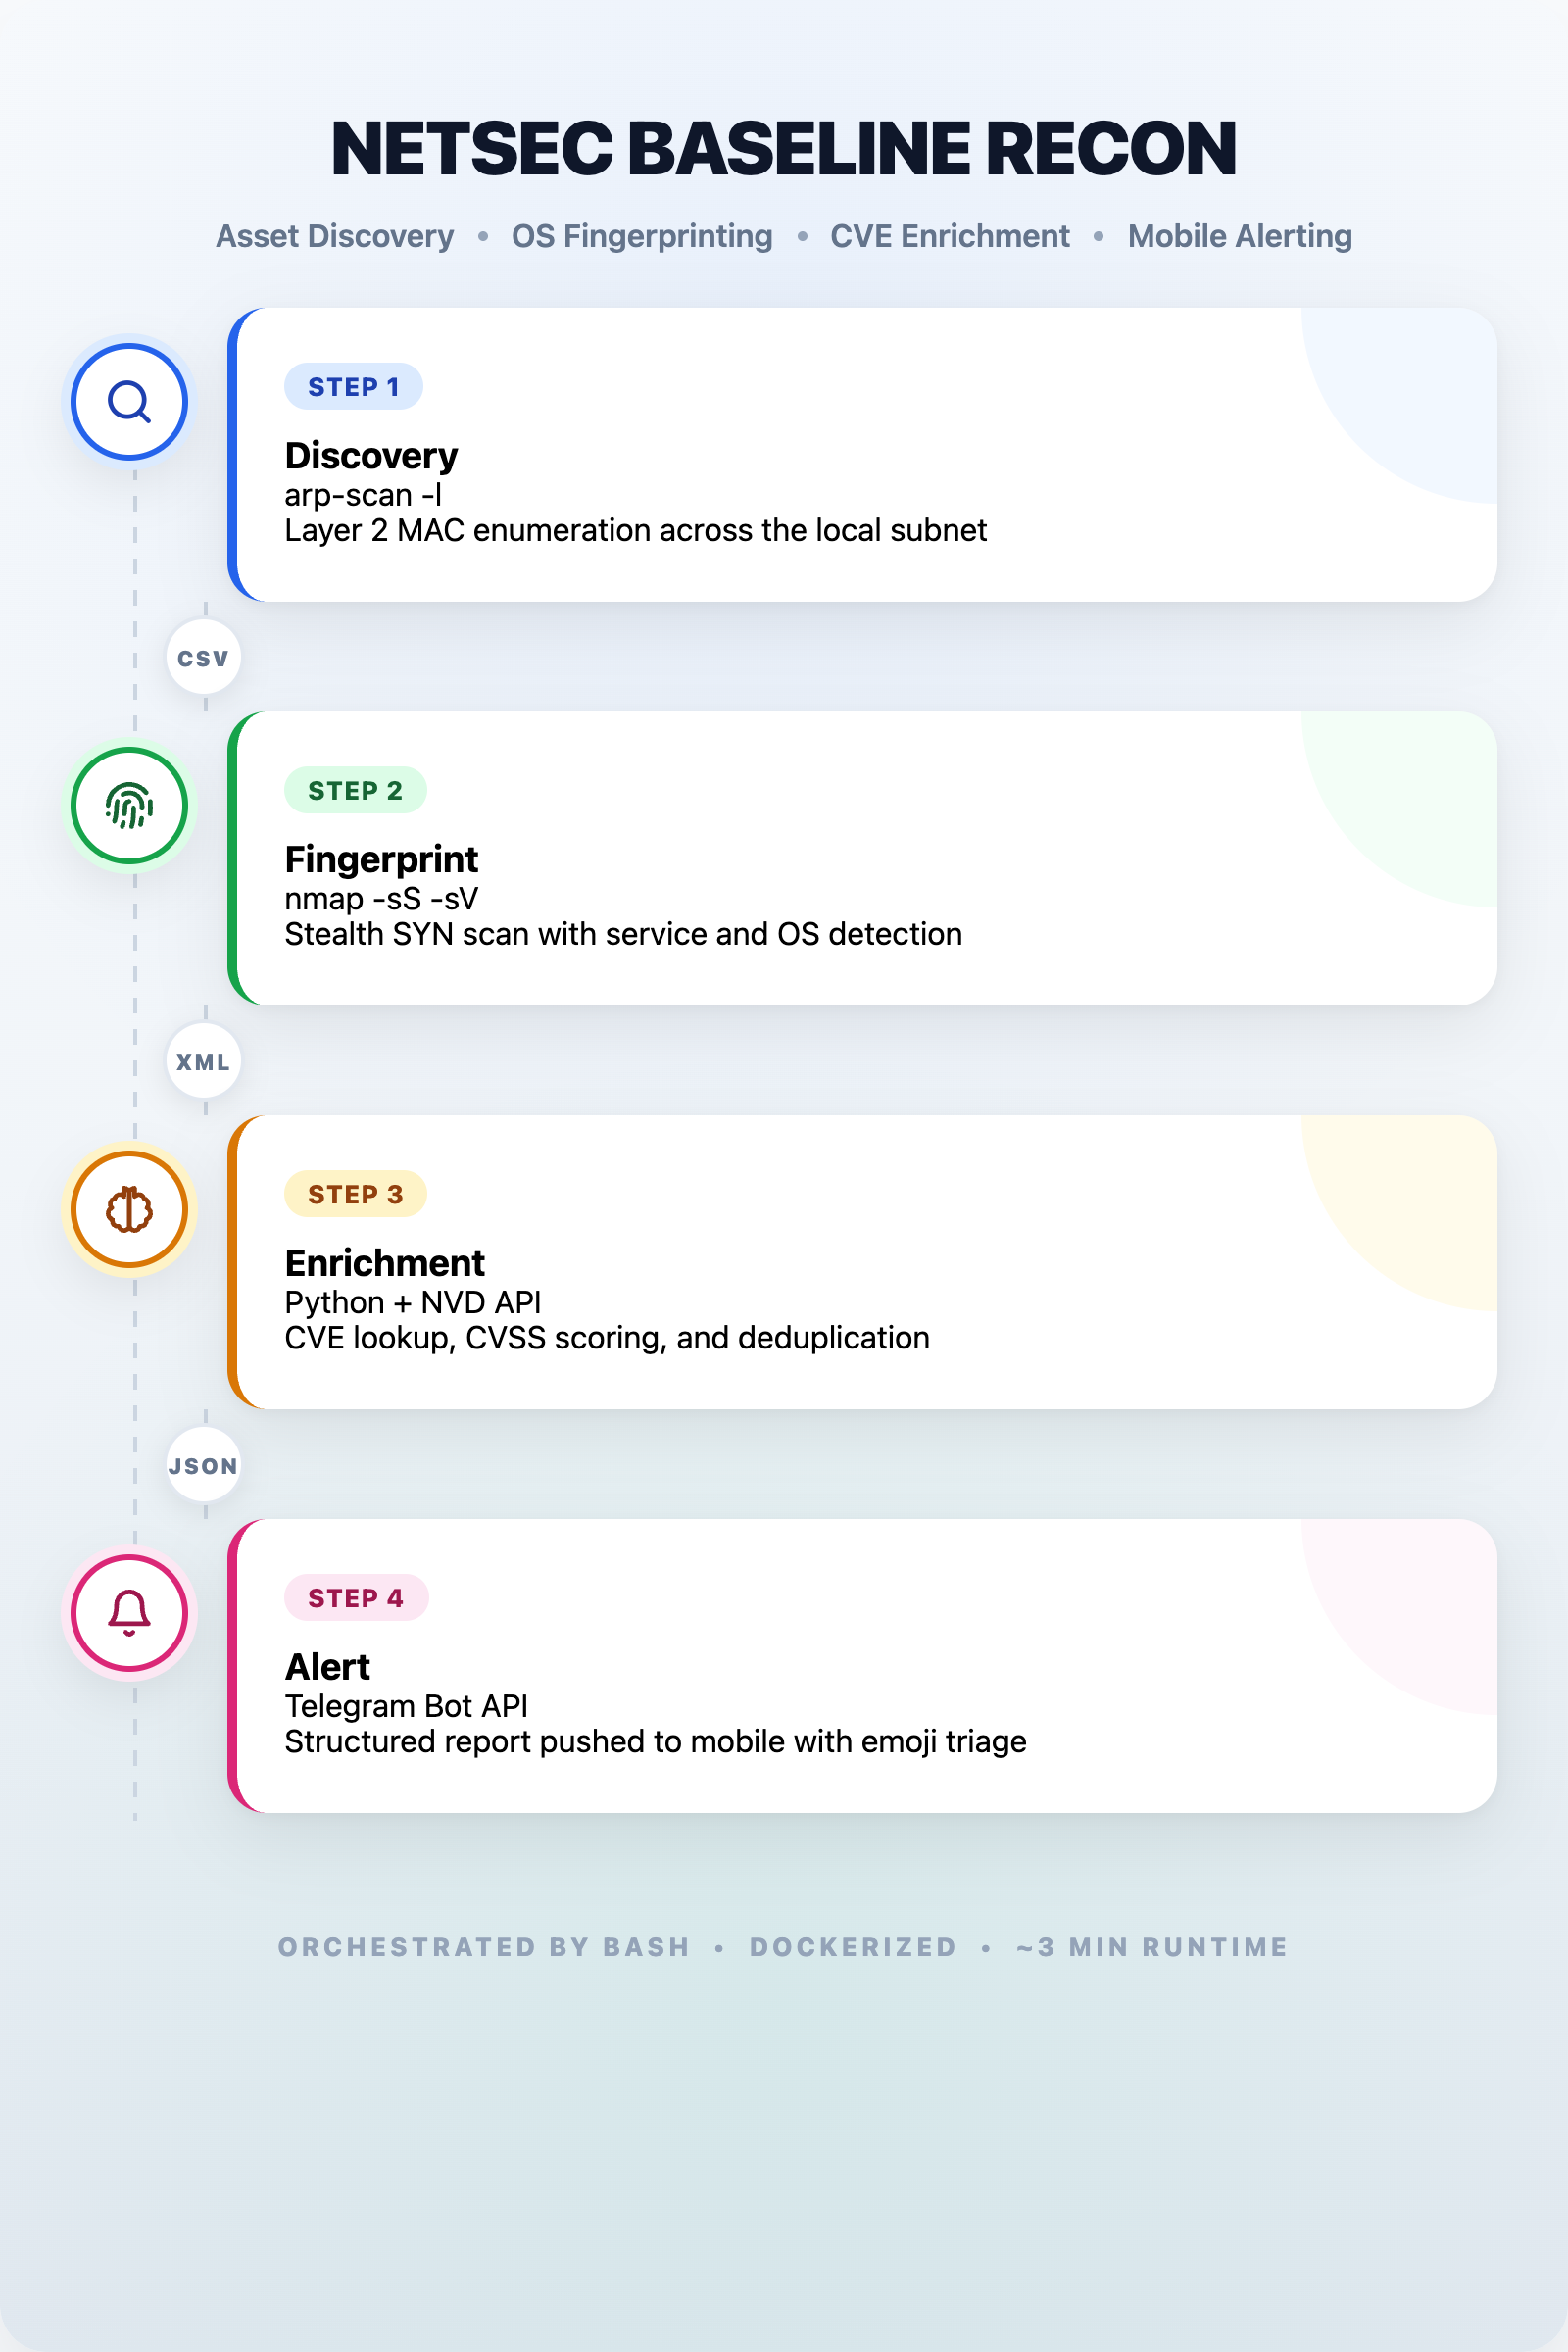
Step 1: Hello, Is Anyone There?
The first stage uses arp-scan, a delightfully simple tool that shouts “who’s there?” on your local network and listens for replies. It operates at a low level, so it doesn’t try to connect to your devices. It just asks them to identify themselves. Think of it as a roll call rather than an interrogation.
The nice thing about arp-scan is that it’s quiet. No TCP connections, no firewall alerts. It sends a broadcast message and catalogs MAC addresses and vendor names. Even your smart fridge has to answer, because it’s a fundamental part of how Ethernet works.
The output is a simple CSV: IP address, MAC address, and manufacturer. That’s it. The first layer of any network security baseline. No port probing yet. We’re just making a guest list.
Step 2: Let’s Talk to the Guests
Once I have the guest list, I hand it to Nmap. Every security person has a love-hate relationship with Nmap. It is incredibly powerful, but power without restraint makes noise. I didn’t want to blast every port like an attacker. I wanted a polite, focused conversation.
So I configured it to send SYN packets without completing handshakes (stealthy, less logging), check the top 1000 most common ports, ask services what version they are running, and make an educated guess about the operating system based on network behavior. I also run a handful of safe NSE scripts that check SSL certificates and HTTP headers without exploiting anything.
The results get saved as XML, becoming the second layer of the network security baseline. XML sounds like a pain, but it’s structured and parseable. My next tool consumes it directly, eliminating fragile regex on text logs. I’ve been burned too many times by that approach.
I built a custom Docker image for this stage: Alpine Linux base, stripped of GUI dependencies, under 90 MB. The container runs without root privileges and only has write access to the output directory. These constraints mirror how I’d want a scanner deployed in production, and practicing them at home means the habits stick.
Step 3: Matching Software to Known Bugs
Nmap gives me banners like “OpenSSH 8.9p1” or “nginx 1.18.0.” That’s useful, but only if you do something with it. The next stage is a Python script that reads those banners, extracts the product name and version, and asks a simple question: does the National Vulnerability Database know about any public security flaws for this exact software?
The NVD is a free government-run database maintained by NIST. Feeding it into the network security baseline gives me actionable threat context. It’s the same source that feeds commercial vulnerability scanners. My script queries their API, gets back a list of CVEs, and filters them by severity score.
This stage taught me about being a good API citizen. The NVD limits you to 50 requests per 30-second window, so my script deduplicates requests, implements exponential backoff if rate-limited, and caches results locally so repeat scans don’t hammer the server. These are small details, but they’re the difference between a script that works once and a tool that runs reliably every night at 2 AM.
Step 4: The Report Lands on My Phone
The final step compiles everything into JSON and sends me a Telegram message. I know. Telegram sounds informal for a security tool. But hear me out.
It requires no open ports on my side. The scanner makes an outbound HTTPS connection, same as loading a website. The message arrives on my phone with a clean summary: how many devices, any critical CVEs found, and a link to the full JSON report. I can scroll through it while making coffee without logging into a dashboard or VPN.
For hosts with serious vulnerabilities, the message gets a red flag emoji and gets pinned. For clean scans, I get a green checkmark and go about my day. The visual triage is genuinely useful. My brain processes an emoji faster than a table of numbers.
The JSON output is the real artifact, though. It is the living record of the network security baseline. It’s timestamped, structured, and designed to be diffed. If I run the scan weekly, I can compare two JSON files and immediately spot the new device that appeared, or the host that suddenly has a new open port. That diff capability is where the “baseline” part of the name comes from. This isn’t just a snapshot. It’s a series of snapshots that tells a story over time, forming a longitudinal network security baseline.

Why Docker?
I could have written this as a single Python script and called it a day. But I containerized it for three practical reasons.
Dependencies are a pain. Nmap has a huge footprint. Lua scripts, shared libraries, dictionary files, the works. Installing it directly on my laptop means I’m responsible for keeping it updated and avoiding conflicts. The Docker image pins a specific Nmap version, includes exactly the scripts I need, and behaves the same way on my laptop, a friend’s machine, or a cloud VM.
Hardening by default. The container runs as an unprivileged user with resource caps. It can write scan results to a mounted folder, but it can’t touch the rest of my filesystem. If an Nmap script gets stuck in a loop, it can’t consume all my CPU or memory.
Network visibility without host access. By giving the container host-level network access, it sees the same ARP tables and broadcast traffic as my laptop. But it’s still isolated in its own namespace. A guest on my system, not a resident.
These principles, minimal images, least privilege, immutable infrastructure, are standard when you productionise a network security baseline, but they feel abstract until you’ve actually wrestled with a Dockerfile. Building this tool gave me a tangible reason to care about container hardening beyond “the compliance checklist says so.
What I’d Do Differently
No project is perfect. Here are the honest limitations:
It only sees the local subnet. ARP doesn’t cross routers, so devices on a guest network or VLAN won’t appear without additional configuration. A future version might integrate SNMP or routing table inspection to broaden the network security baseline beyond the local subnet.
The NVD API is slow. On a network with diverse software, enrichment can take 5–10 minutes because of rate limits. A local CVE mirror would solve this, but it’s a weekend project I haven’t tackled yet.
No credential testing. This tool maps and inventories. It does not attempt to log into anything. That’s an intentional boundary (reconnaissance, not exploitation), but a comprehensive hardening program would pair this with authenticated scanning in a separate phase.
OS fingerprinting is guesswork. Nmap’s OS detection is probabilistic and sometimes hilariously wrong. I’ve seen it confidently identify a Raspberry Pi as Windows XP because both used similar TCP settings. The confidence scores help, but human review is still necessary for surprises.
Try It If You’re Curious
The project is open source and documented. If you want to run it yourself, you’ll need a Linux machine (or VM, or WSL) with Docker, a network interface on the target subnet, a free Telegram bot token, and a free NVD API key.
The README has a quick-start with docker-compose up and a troubleshooting section for the inevitable “why can’t it see my interface?” question.
If you’re new to this, start with just arp-scan and Nmap. Run them manually, read the output, look up what the service banners mean. The vulnerability enrichment is cool, but the fundamentals, understanding what’s on your network and why, are where the real learning happens.
Final Thoughts
netsec-baseline-recon isn’t revolutionary. ARP scanning and Nmap are older than some programming languages. What made it worthwhile was the integration behind a simple network security baseline: taking raw network noise, turning it into structured data, enriching it with actual threat intelligence, and delivering it in a format that respects my attention.
That last part is underrated. Security tools love to generate walls of data and call it visibility. Real visibility, the kind a proper network security baseline provides, is actionable. It tells you what changed since last week, which is exactly what a network security baseline should do. It tells you whether a new CVE is actually relevant to your environment. It tells you if something new appeared on the network and whether you should worry about it.
Building this network security baseline taught me to think like an integrator rather than an operator. Anyone can run Nmap. The interesting part is wiring it into a pipeline that makes decisions, handles failures gracefully, and produces output that a human can act on without a PhD in network protocols.
Also, I now know exactly how many devices are on my network thanks to this network security baseline. It’s twenty-three. One of them is still a mystery. I’m working on it.
Questions about the build? Want to compare notes on home lab setups? I’m always happy to chat. Reach out on LinkedIn or GitHub. And if you build something similar, I’d genuinely love to hear what you learned.